How to create your own blog with zero cost - Story of virtualdump
Who won’t like your own blog in your own domain. But to do all this, you needs to spent few bucks. If not you can go with a popular blogging site like Medium. But every techie would love their own space. So, here is the story of Virtual Dump
What you will need,
- GitHub account - Sign up
- FreeNom account - Sign up
- Cloud-flare account - Sign up
- Precious time of yours

FYI this is a high level walk-through about how to get it up and running, i will share all the resources, you have to do it your own. Add a little touch of yours to it, don’t do what everyone does.
First things First, lets get your blog up and running locally before we move into deploying etc.
Build your static site
I’m gonna use GitHub pages to make my static website. You can build your site from ground up by doing everything manually by writing HTML, CSS and JavaScript. But it will take forever, You don’t need that. One of the first principles of programming is Code Re-usability. Which means, you don’t need to write something which is already there. Just use the damn thing. So lets talk about the frameworks you can use with GitHub pages.
There are so many static site generators but there is one which is backed by GitHub itself, jekyll. It uses cool templating language Liquid which will gonna make your life so much easier. There is two approaches you can take,
- Build the site with a fresh jekyll project - Good approach, lot to learn
- Be a smuch like me and use a free jekyll theme and customize - Easy though
So I’m gonna go with the shortcut here. Here is a good collection of themes http://jekyllthemes.org where you can choose one for yourself. I went with mmistakes . Thanks Michael Rose for this cool theme. So lemme clear up, why using a theme is really easy.
- No needs to do the ground work such as headers, footers and page configurations as they are already done.
- No needs to worry about Facebook commenting, post sharing, Google analytics, google adsense, basically most of the config stuff that will take days to implement.
So what you have to do is clone such repo and configure as you want. Yes, you will need sometime to familiar with jekyll and it’s commands. If you don’t know something, it’s all here https://jekyllrb.com/docs/. Else search for it. ![]() Once you are done, you have to push it to github. Before do that log on to GitHub and create a GitHub page repository. You can learn how to do that here https://pages.github.com/. It’s same as creating a usual GitHub repository. Only difference is repository name should be in the format of username.github.io. Once you have done that inside your local website folder, change the git remote origin like this,
Once you are done, you have to push it to github. Before do that log on to GitHub and create a GitHub page repository. You can learn how to do that here https://pages.github.com/. It’s same as creating a usual GitHub repository. Only difference is repository name should be in the format of username.github.io. Once you have done that inside your local website folder, change the git remote origin like this,
` git remote set-url origin git@github.com:USERNAME/REPOSITORY.git `
Once you have done that commit all the changes and push to the origin. Then go to http://username.github.io/ and you will see that your static site is up and running. ![]()
Let’s move on to next phase.
Add a Cool domain
As we are going to do everything without wasting a penny, then we must find a free domain provider. TK domains are free but not for long. You can use them for sometime, but when the traffic increases, they tends to pull the plug. ![]() Everything in life comes with a price. Anyway lets get this up with a semi-free domain.
Everything in life comes with a price. Anyway lets get this up with a semi-free domain.
What you have to do is go to FreeNom and create a account if you don’t have one already. After that you can search for the domain and buy it for free. After that you have to route the traffic through this domain to your gh page. As you may already know this process is called domain name resolution. What we do here is we add the Domian -----> gh page mapping to known name servers. Then when we search the domain it will resolved by the name servers to the gh page url. As we are referring our gh page using the URL, we call this CNAME record. Enough of this side talk, lets do this.
You can either use freenom dns or you can use another dns service. Lets go with cloudflare for now. Once you created a cloudflare account, what you have to do is add your domain to the cloudflare. After that you can configure the dns. In the DNS management section add the www record and root domain record to your blog as below. www record helps to route all the www.blogname.tk requests to your github page and the root record ( root -> blogname.tk ) will help to route blogname.tk requests. Once you are done, you have to add the cloudflare domain name servers to your domain provider. Do you see the two Cloudflare nameservers provided below, Yeah that’s it.
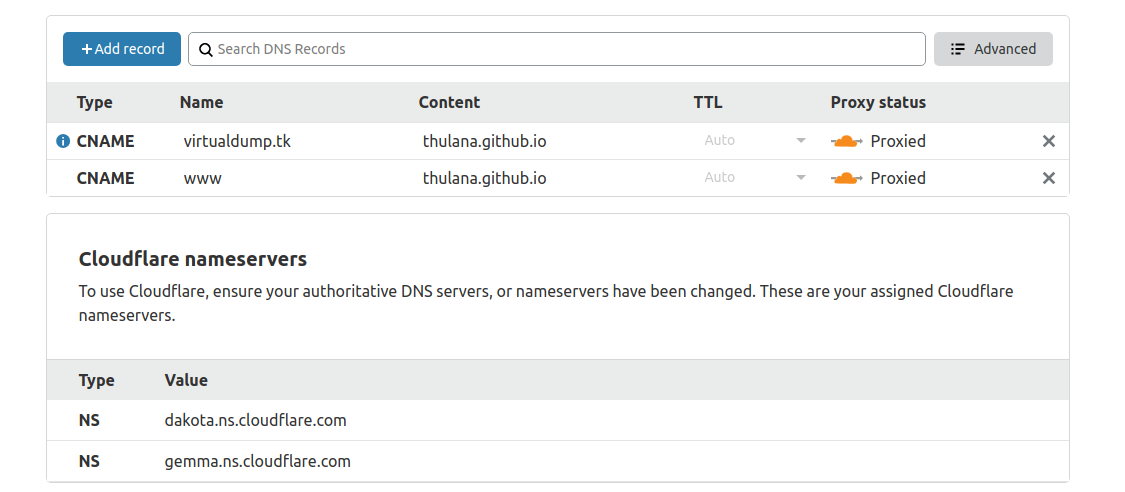
Copy those two and add it in the Freenom name server management section. ( Refer the screenshot below, if you can’t find it. It’s under management tools. ![]() )
)
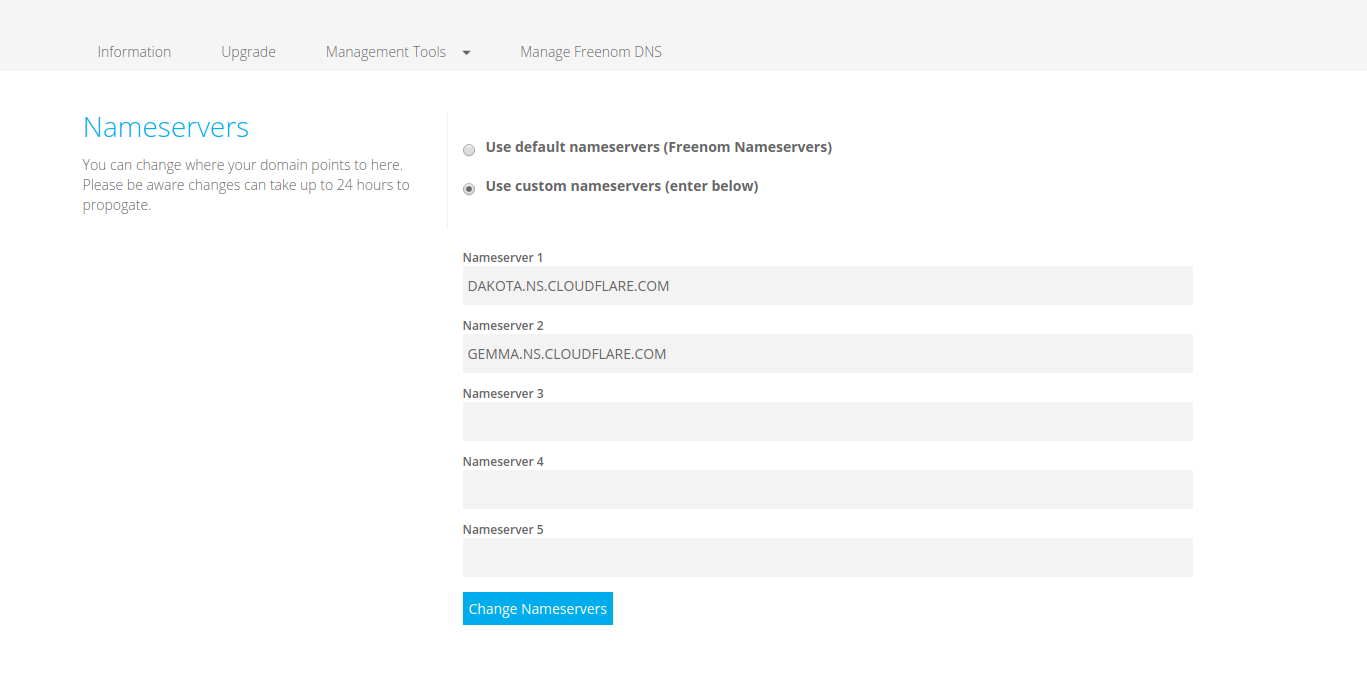
All set then, actually it’s not. ![]() You gotta to another small thing. Now the name servers know where your blog is, but does the blog knows when it should be ? No. We have to do that. Go to your GitHub repository, under settings -> options you can add a custom domain. Refer the screenshot below.
You gotta to another small thing. Now the name servers know where your blog is, but does the blog knows when it should be ? No. We have to do that. Go to your GitHub repository, under settings -> options you can add a custom domain. Refer the screenshot below.
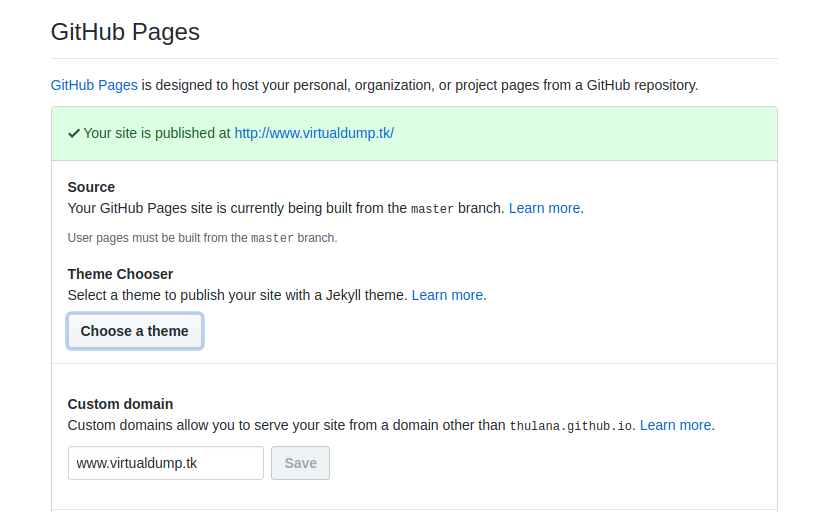
Usually it take some time ( hours to a day max) to all DNS configurations to sink in. After that your blog should be alive on that domain.
This is how you could get your blog up and running in a really short time. After this, it’s all up to you. When you get lots of traffic, you may need to move on to a paid domain. You can experiment here onwords. Lemme give you few homeworks to try on,
- Try adding Google Analytics
- Set up FB, discourse,disqus commenting
- Change the look and customize as you want
- Keep adding good content
Tnx for reading this and don’t forget to leave a comment too. Correct me if I did anything wrong ![]() . Appreciate your feedback, and contact me if you want to know something.
. Appreciate your feedback, and contact me if you want to know something.
Leave a Comment